
If you use GitLab and you have an account AWS, it’s time to step up your game and automatize everything. We are going to setup a system which will deploy every branch you create to S3, and clean up after yourself when the branch is merged or deleted.
AWS S3 is just a storage container, so of course you can’t host in this way a dynamic website, but for a static one (as this blog), it is perfect.
Also, please note that AWS S3 buckets for hosting a website are public, and while you need to know the URL to access it, there are way to list them. So do not set up this system if you have private data on your website.
Of course, standard S3 prices will apply.
We will use GitLab CI, since it is shipped with GitLab and deeply integrated with it.
Gitlab CI is a very powerful system of Continuous Integration, with a lot of different features, and with every new releases, new features land. It has a rich technical documentation that I suggest you reading.
If you want to know why Continuous Integration is important I suggest reading this article, while for finding the reasons for using Gitlab CI specifically, I leave the job to Gitlab.com itself. I’ve also written another article with a small introduction to Gitlab CI.
I suppose you already have an AWS account and you know a bit how GitLab CI works. If not, please create an account and read some of the links above to learn about GitLab CI.
Setting up AWS
First thing is setting up AWS S3 and a dedicated IAM user to push to S3.
Since every developer with permissions to push to the repository will have access to the tokens of the IAM use, it is better to limit its permissions as much as possible.
Setting up S3
To set up S3, go to S3 control panel, create a new bucket, choose a name (from now on, I will use example-bucket) and a region, and finish the creation leaving the default settings.
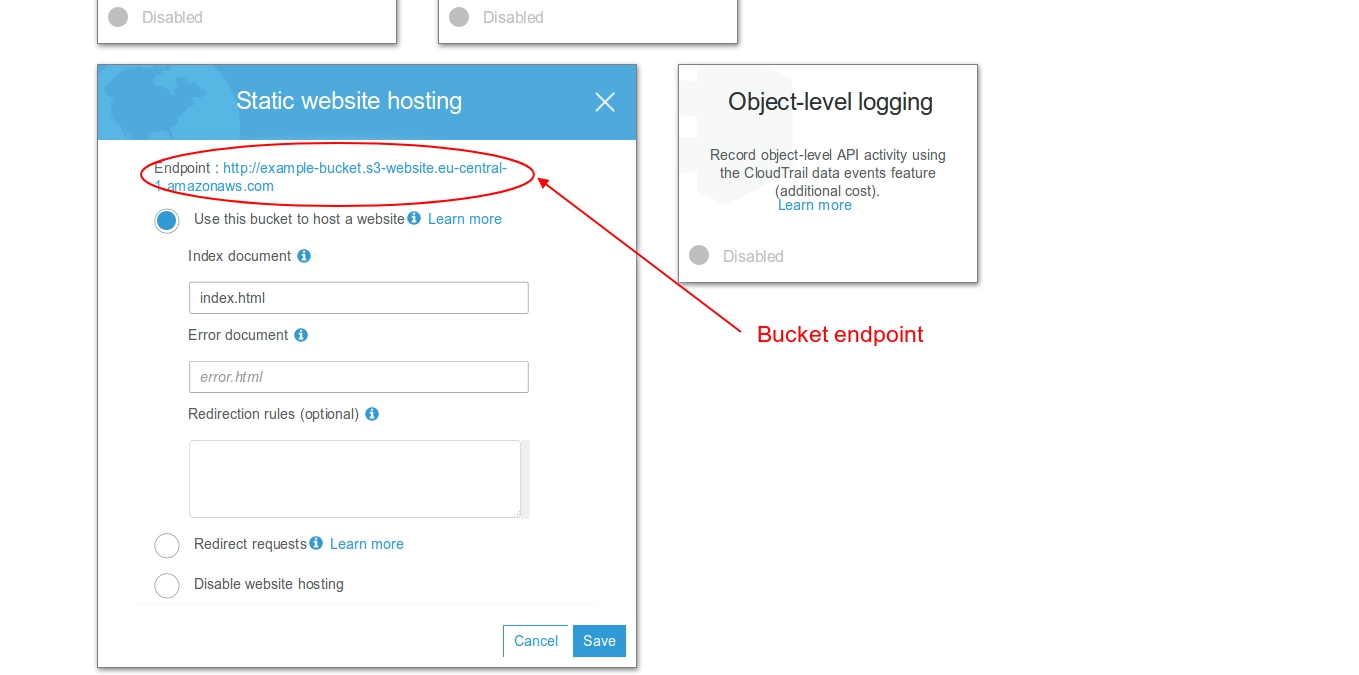
After that, you need to enable the website management: go to Bucket -> Properties and enable Static website hosting, selecting Use this bucket to host a website as in the image. As index, put index.html - you can then upload a landing page there, if you want.
Take note of the bucket’s URL, we will need it.
We now grant permissions to read objects to everybody; we will use the policy described in the AWS guide. For other information on how to host a static website, please follow the official documentation.
To grant the read permissions, go to Permissions->Bucket policy and insert:
1{ 2 "Version":"2012-10-17", 3 "Statement":[{ 4 "Sid":"PublicReadGetObject", 5 "Effect":"Allow", 6 "Principal": "*", 7 "Action":["s3:GetObject"], 8 "Resource":["arn:aws:s3:::example-bucket/*"] 9 }]10}Of course, you need to insert your bucket’s name in the Resource line.
Creating the IAM user
Now we need to create the IAM user that will upload content to the S3 bucket, with a policy that allows only upload to our GitLab bucket.
Go to IAM and create a new policy, with the name you prefer:
1{ 2 "Version": "2012-10-17", 3 "Statement": [ 4 { 5 "Sid": "VisualEditor0", 6 "Effect": "Allow", 7 "Action": [ 8 "s3:GetObject", 9 "s3:PutObject",10 "s3:DeleteObject"11 ],12 "Resource": "arn:aws:s3:::example-bucket/*"13 },14 {15 "Sid": "VisualEditor1",16 "Effect": "Allow",17 "Action": "s3:ListBucket",18 "Resource": "*"19 }20 ]21}Of course, again, you should change the Resource field to the name of your bucket. If you know the GitLab runners’ IPs, you can restrict the policy to that IPs.
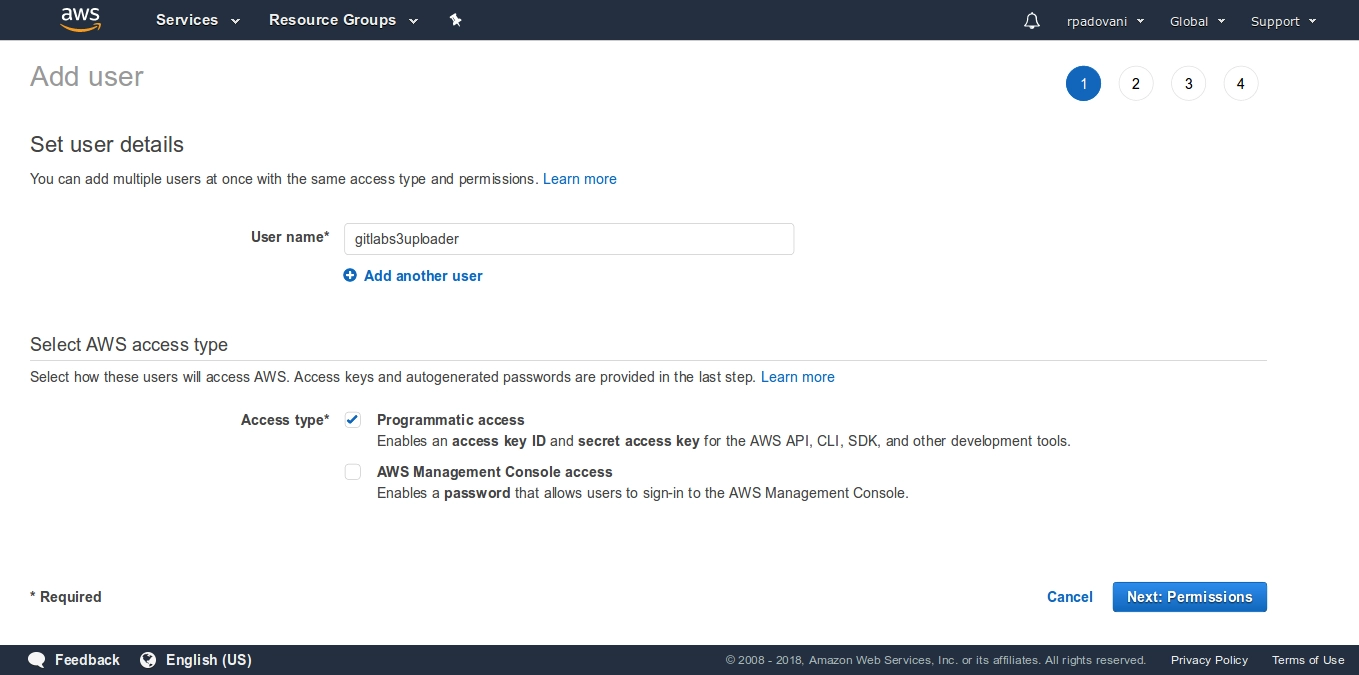
Now you can create a new user granting it Programmatic access. I will call it gitlabs3uploader. Assign it the policy we just created.
For more information on how to manage multiple AWS accounts for security reasons, I leave you to the official guide.
Setting up GitLab CI
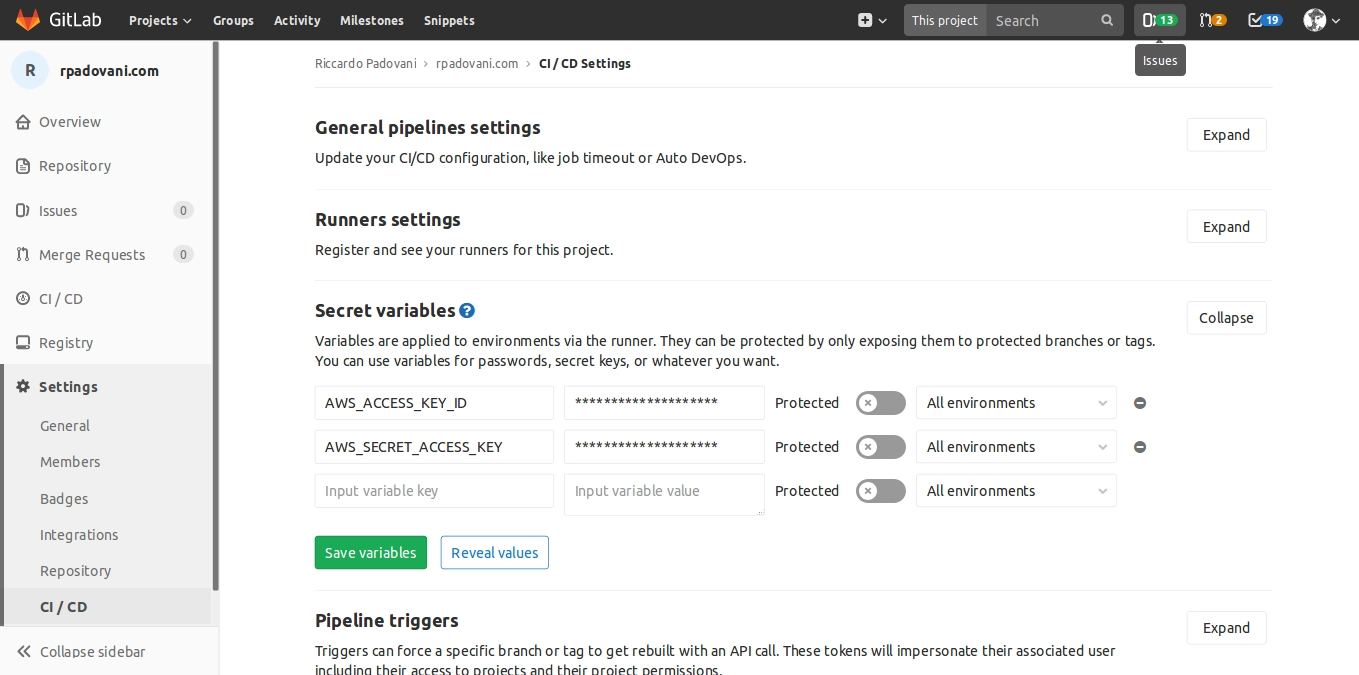
We need to inject the credentials in the GitLab runner. Go to your project, Settings -> CI / CD -> Secret variables and set two variables:
AWS_ACCESS_KEY_ID with the new user’s access key
AWS_SECRET_ACCESS_KEY with the new user’s access secret key
Since we want to publish every branch, we do not set them as protected, because they need to be available in every branch.
.gitlab-ci.yml
We now need to explain GitLab how to publish the website. If you need to build it before, you can do so. rpadovani.com uses Jekyll, so my .gitlab-ci.yml file is like this:
1image: "registry.gitlab.com/rpadovani/rpadovani.com:latest" # Custom Ruby image, replace with whatever you want 2stages: 3 - build 4 - deploy 5For more information about dynamic environments, see the documentation.
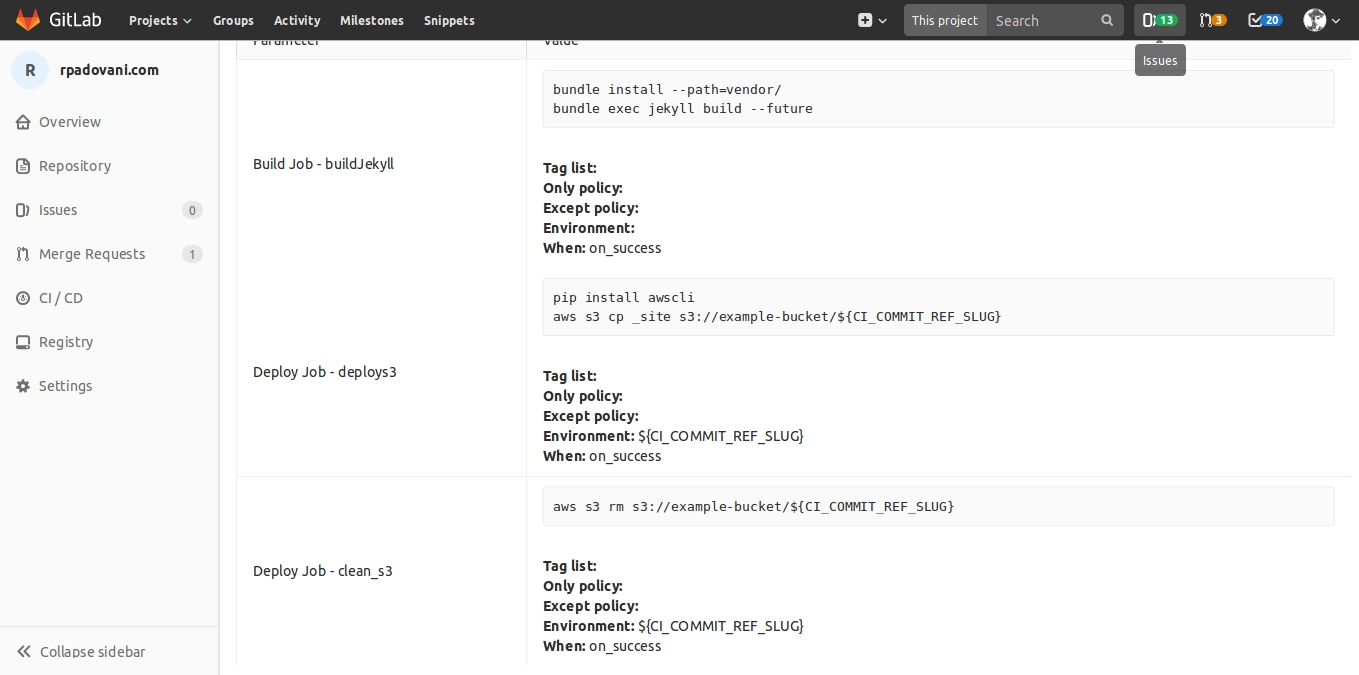
To verify your .gitlab-ci.yml is correct, go to your project on GitLab, then CI / CD -> Pipelines, and in the top right of the page there is a CI Lint link. It does not only lint your code, but it also creates a nice overview of all your jobs.
Thanks to the environments, we will have the link to the test deployment directly in the merge request, so your QA team, and every other stakeholder interested in seeing the website before going to production, can do it directly from GitLab.
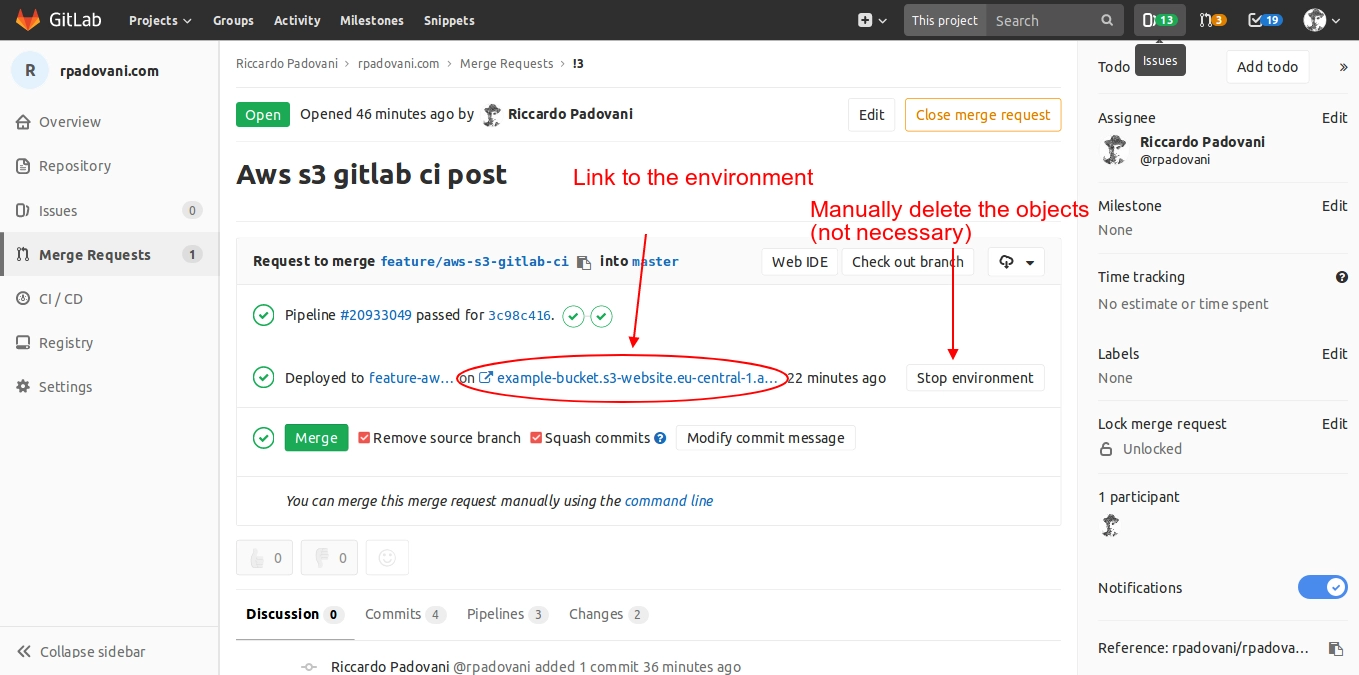
Also, after you merge your branch, GitLab will clean after itself, so you do not have useless websites in S3.
You can also see all the deployments in CI / CD -> Environments, and trigger new deploys.
Conclusion
They say 2018 is the year for DevOps. I am not sure about that, but I am sure that a well configured Continuous Integration and Continuous Delivery system save you and your company a lot of time and headaches.
If your builds are perfectly reproducibly, and everything is automatic, you can focus on what really matters: developing solutions for your customers.
This was a small example on how to integrate AWS and GitLab, but you know the only limit is your fantasy. Also, a lot of new features are introduced every month in Gitlab and GitLab CI, so keep an eye on the Gitlab blog.
Kudos to the Gitlab team (and others guys who help in their free time) for their awesome work!
If you have any question or feedback about this blog post, please drop me an email at [email protected] or leave a comment below :-) Feel free to suggest me to add something, or to rephrase paragraphs in a clearer way (English is not my mother tongue).
Bye for now,
R.
Updates
19th September 2018: fix the S3 bucket URL in the .gitlab-ci.yml file, thanks to James Delaney.
29th December 2019: fix the s3:ListBucket permission, thanks to Grzegorz Wozniak.
Comments