
Gitlab CI is amazing (as Gitlab is), Gitlab team is doing a great work and they implement new features every month. So today I chose to move also this blog to Gitlab CI.
This blog is based on Jekyll. The source code was already hosted on Gitlab but, until yesterday, it didn’t use Gitlab CI: every time I pushed something, a webhook called a script on my server, the server downloaded the source code, compiled it and then published it.
The bad in this that approach is the same server which runs the website (and other services as well) wasted CPU, storage and time doing compilation.
I have others servers as well (but if you do not, don’t worry, Gitlab offers free runners for Gitlab CI if you host your project on Gitlab.com), so I installed a Gitlab runner as explained here and set it to use Docker.
gitlab-ci.yml
The first thing to do after enabling the runner was to create a gitlab-ci.yml file to explain to the runner how to do its job. The fact Gitlab uses a file to configure runners it’s a winning choice: developers can have it versioned in the source and each branch can have its own rules.
My configuration file is this:
1image: ruby:2.3 2stages: 3 - deploy 4Quite simple, isn’t it?
In the end I need only to deploy the website, I do not have tests, so I have only one stage, the deploy one.
There are however few interesting things to highlight:
I install gems in
vendor/instead of the default directory, so I can cache them and reuse in others builds, to save time and bandwidthThe cache is shared between all the branches in the repo (key: “$CI_BUILD_REPO”). By default it is shared only between multiple builds of the same branch
The deploy step is executed only when I push to master branch
The site is build in _site/ directory, so I need to specify it in the
artifactssection
If you want to see how to tune these settings, or learn about others (there are a lot of them, it is a very versatile system which can do anything), take a look to the official guide.
The Gemfile for bundler is very basic:
1source 'https://rubygems.org'2gem "github-pages"3gem "pygments.rb"It is important to add vendor directory to the exclude section in _config.yml, otherwise Jekyll will publish it as well.
Deploy
If you push these files on your Gitlab’s repo, and if you have done a good job setting up the runner, you will have an artifact in your repo to download.

Next step is to deploy it to the server. There are tons of different possible solutions to do that. I created a sh script which is invoked by an hook.
Since I already have PHP-fpm installed on the server due my Nextcloud installation, I use it to invoke the sh script through a php script.
When you create a webhook in your Gitlab project (Settings->Webhooks) you can specify for which kind of events you want the hook (in our case, a new build), and a secret token so you can verify the script has been called by Gitlab.
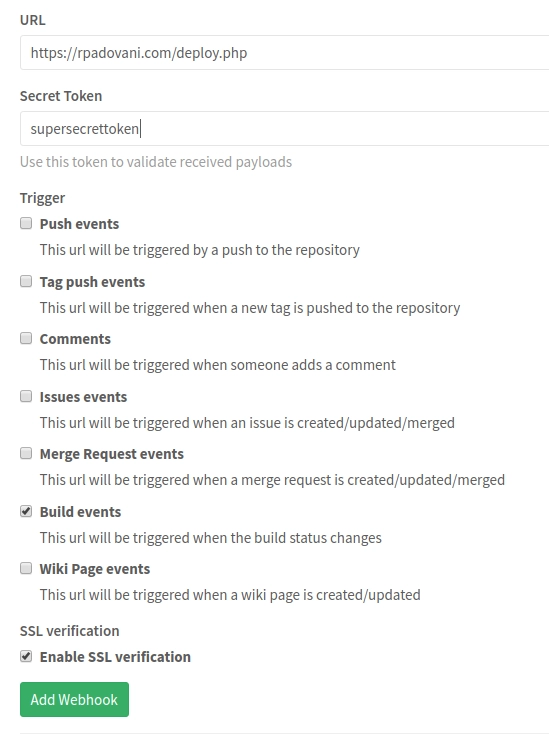
Unfortunately, the documentation about webhooks is very poor, and there isn’t any mention about builds payload.
Anyway, after a couple of tries, I created this script:
1<?php 2// Check token 3$security_file = parse_ini_file("../token.ini"); 4$gitlab_token = $_SERVER["HTTP_X_GITLAB_TOKEN"]; 5Since the repo of this blog is public, I cannot insert the token in the script itself (and I cannot insert it in the script on the server, because it is overwritten at every deploy).
So I created a token.ini file outside the webroot, which is just one line:
1token = supersecrettokenIn this way the endpoint can be called only by Gitlab itself. The script then checks some parameters of the build, and if everything is ok it runs the deploy script.
Also the deploy script is very very basic, but there are a couple of interesting things:
1#!/bin/bash 2# See 'Authentication' section here: http://docs.gitlab.com/ce/api/ 3SECRET_TOKEN=$PERSONAL_TOKEN 4First of all, the script has to be executable (chown +x deploy.sh) and it has to belong to the webserver’s user (usually www-data).
The script needs to have an access token (which you can create here) to access the data. Again, I cannot put it in the script itself, so I inserted it as environment variable:
sudo vi /etc/environment
in the file you have to add something like:
PERSONAL_TOKEN="supersecrettoken"
and then remember to reload the file:
source /etc/environment
You can check everything is alright doing sudo -u www-data echo PERSONAL_TOKEN and verify the token is printed in the terminal.
Now, the other interesting part of the script is where is the artifact. The last available build of a branch is reachable only through API; they are working on implementing the API in the web interface so you can always download the last version from the web.
The url of the API is
https://gitlab.example.com/api/v3/projects/projectid/builds/artifacts/branchname/download?job=jobname
While you can imagine what branchname and jobname are, the projectid is a bit more tricky to find.
It is included in the body of the webhook as projectid, but if you do not want to intercept the hook, you can go to the settings of your project, section Triggers, and there are examples of APIs calls: you can determine the project id from there.
Kudos to the Gitlab team (and others guys who help in their free time) for their awesome work!
If you have any question or feedback about this blog post, please drop me an email at [email protected] :-)
Bye for now,
R.
Comments