
Hi all, after long time I return to write to show you how to create a simple game for Ubuntu for Phones (but also for Android) with Bacon2D.
Bacon2D is a framework to ease 2D game development, providing ready-to-use QML elements representing basic game entities needed by most of games.
In this tutorial I’ll explain you how I create my first QML game, 100balls, that you could find on Ubuntu Store on Phones. Source is available on GitHub. This is not a tutorial on QML or Javascript, so I focus only on Bacon2D components, and I leave to you all other things, such implementing advanced features in the game, and I suppose that you already know QML. 100balls is a very simple but addictive game. You have to put as many balls as you can in a moving glass, trying to not lose any.
Installation
So, first of all we need to install Bacon2D on our system. I suppose you have already installed Qt on your system, so we only need to take source and compile it:
Now you have Bacon2D on your system, and you can import it in every project you want.
A first look to Bacon2D
Bacon2D provides a good number of custom components for your app. Of course, I can’t describe them all in one article, so please read the documentation. We’ll use only few of them, and I think the best way to introduce you to them is writing the app. So, let’s start!
First of all, we create our base file, called 100balls.qml:
The first element we add is the Game element. Game is the top-level container, where all the game will be. We set some basic property and the name of the game, with gameName property:
But the Game itself is useless, we need to add one or more Scene to it. A scene is the place where all Entity of the game will be placed. Scene has a lot of property, for now is importat to set two of them: running indicates if all things in the scene will move, and if game engine works; second property is physics, that indicates if Box2D has to be used to simulate physic in the game. We want a game where some balls fall, so we need to set it to true.
Also, we need to set a Game property: currentScene. It indicates, as name said, which is the currentScene, so you could have more than one scene, and change them during the game. Maybe you want to use a Scene as main menu, or you have more than one level, and every level is a scene, and so on. You specify which is the current scene by its id.
Now we have a game, and a scene where we want to run our game. So, in our game we need 100 balls, it’s time to create them! A ball is an entity, that is basic game entity, includes physics (Box2D) properties, responds to scene updates and can contain game logic. To manage balls easily we create a new component in a new file. All components should be in the “components” folder. We call the file Ball.qml, and we put in it something like this:
This should be easy to understand, there is nothing related to Bacon2D: we created a Rectangle with a radius that is half of its size: a circle. We could easily add 100 of them in our scene:
Again, nothing strange: I imported Ball.qml and created 100 of them. Should be interesting to see that I didn’t attach the balls to scene itself, but to the world that the scene creates. Althought you’ll don’t use the world component on its own again, it’s important this distinction: objects that you want to add in a scene have to be attached to the world component.
Now, if you run your app you should have something like this:
Yes, nothing so exciting. Maybe we need to add some physic to the balls. First of all, we need to say to Bacon 2D what are the outlines of our balls: we’ll use the fixtures property:
Fixture itself it’s quite interesting, with a rich documentation. Of all properties I’m interested in only 3:
density: This property represents the density used to compute the mass properties of the parent entity.
friction: Friction is used to make objects slide along each other realistically.
restitution: Restitution is used to make objects bounce.
We add this fixtures to Ball.qml, along with other 2 properties: bodyType, that could be Entity.Static, Entity.Kinematic or Entity.Dynamic and sleepingAllowed. What does sleep mean? Well it is expensive to simulate bodies, so the less we have to simulate the better. When a body comes to rest we would like to stop simulating it. Unfortunately, our balls can’t sleep, because is needed a collision to wake up them, and there aren’t collisions in our game. As bodyTime we choose Entity.Dynamic, so the body is fully simulated.
Now, if you start the app you’ll see the balls fall! Yeah! Things are becoming pretty interesting, aren’t them?
Building the game
We want that users choose when the balls have to fall, so we create a new component, called Bowl.qml, in the folder components. As before, we need to draw it and to create fixtures. This is a bit boring, because you have to think to all sizes. So, this is the file:
Nothing new here. Yes, there is the Canvas element, but I think it’s easy to understand. Anyway, I don’t want to explain Canvas in this tutorial, so please read the official documentation.
We need to import the new component in the main file, just before the ball element:
Try to start the app now, it’s beatiful, isn’t it? Next thing to do is to create the door, and to check the input from the user to open it.
There is a interesting thing in this code, so first I’ll show it, then I’ll explain the new property:
This entity is a line, and we put it at the end of the bottleneck. The interesting part is inside a fixture: the sensor property. This property determines if the fixtures is considered a sensor during collision detection. If it’s a sensor, it doesn’t interfere with others entities. So, when our bool property isDoorOpen becomes true, this element becomes a sensor, and balls can fall.
When is the door open? Simple, when the user is pressing anywhere on the screen. We only need a MouseArea to set this behavior:
This is our 100balls.qml file now:
We have something interactive now! Wonderful, the app is starting to be a game!
The glasses
Next step is building the glass where balls fall, then create a lot of them, and check if balls pass trought them or outside. As every new component, we create a file in the components folder and, with a lot of fantasy, we call it Glass.qml
Again, first things first: we need to draw it, that is a bit boring. So for now I write only the code to draw the glass:
Pretty simple, only a bit of math. But we need also to understand when a ball falls in the glass, so we add a sensor at the bottom of the glass, at the end of the fixtures:
Oh, wow, something new! What’s onBeginContact? Well, I think it explains itself: it’s called when an object touches our sensor. Inside it you could use the keyword other.parent to access to property of object that collides with the sensor. So, I created a bool var in Ball.qml that manages contacts, like this:
This is awesome, because we could change all what we want of entities that touch a sensor. Going on with our glass, they don’t use physic, so we use as bodyType Entity.Kinematic. We also could leave it to sleep, so we set sleepingAllowed as true. Now, time of a new property, linearVelocity. It indicates the velocity of the object (you don’t say?). We want our glasses move from right to left, so it has a negative velocity:
Now our Glass.qml should be like this:
Ok, we have our glass, we only need to launch it! We write a little function, called launchGlass() in a new js file, named game.js: we’ll call it when the Game is loaded. So, the function has to create the object, and positioning it on the scene. We can do all this with three lines of code:
Now we only need to add Glass to our scene and launch it, so we call the function in Component.onCompleted:
Now, if you launch the game, you see the glass that goes from right to left! Awesome! But… it’s only one! We want to launch a new glass when the old one go after the half of the screen. Mhhh, we could use a sensor to detect when a glass reaches the half of the screen, but I think it’s time to introduce a new property of entities, behavior. With behavior you can create a script that runs every x milliseconds. To set after how much milliseconds the script has to run again, you use updateInterval.
So we need a script that every 100 milliseconds checks if the glass is after one third of the width of the screen, and launchs another glass if it’s true. Inside a ScriptBehavior you can use the target keyword to access to the parent element.
Of course, we need to import the game.js script also in this file, using import “game.js” as Game
The issue with that code is that a glass launches a new glass every 100 milliseconds. We want that a glass launches only one other glass, so we set a flag to check it.
To end, we want also to destroy glasses when they go out of the screen, to preserve memory:
The score
Next step: we need to destroy balls that don’t go throught a glass, and put again on top of the screen balls that go throught a glass. Also, we implement score and we save highScore to explore another Bacon2D element.
We already know if a ball goes inside a glass, thanks to glassContact var. Now we need only to implement a sensor at the bottom of the page that manages them behavior:
You should know almost all here, we inserted a sensor at the bottom of the scene, and thanks to onBeginContact we check if the balls is gone throught a glass. The only two new things are score and settings.highScore. Score is a simple var in game:
settings.highScore is a component of Bacon2D, Settings: it provides local storage for settings or any in game data. It’s very easy to use:
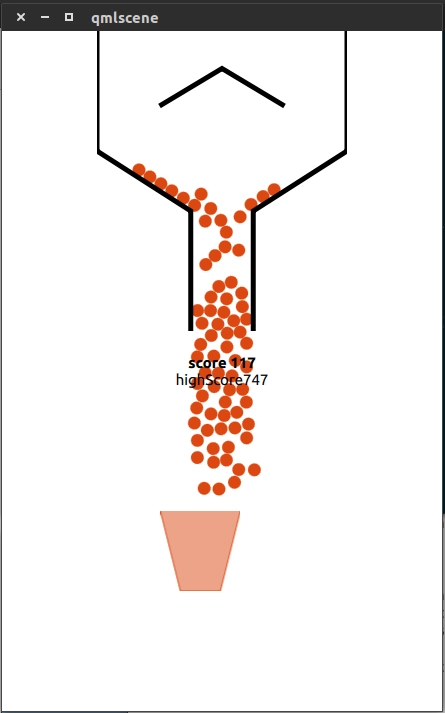
We need only to display score and highScore in the game:
The game is complete now :-)
The main file should be like this:
Congrats, now your first game is ready! Try to start it and beat my personal record: 763!
And now?
In this little tutorial I explained all Bacon2D components I used to build 100balls game for Ubuntu for Phones. Of course, there are a lot of things you could implement to make the game funnier. Here some suggestions:
Create a main menu, where the user goes when all balls are lost, so could start a new game without restart the app
Create levels, every level has different glasses color, and balls become of the same color of the glass they go throught
Implement others game modes: time mode, hard mode (cannot lost more than 10 balls)
Insert a text that says how many balls are left
Create a pause button
If you’re stuck, take a look to my code on GitHub
Bacon2D
If you want an help on Bacon2D, or create a new game, or do a chat, go on #bacon2D channel on Freenode, join the Google+ community, read the documentation
Feedback
I spent almost two weeks to write this article. You know, I’m not an english native speaker, so please forgive mistakes in the text. I hope all steps are clear enough. If you find an error, or something not clear, or whatever you think of this article, please leave a comment or write an email to me (riccardo AT rpadovani DOT com)
A big thanks to Ken VanDine for his support to my approach to Bacon2D
Comments